
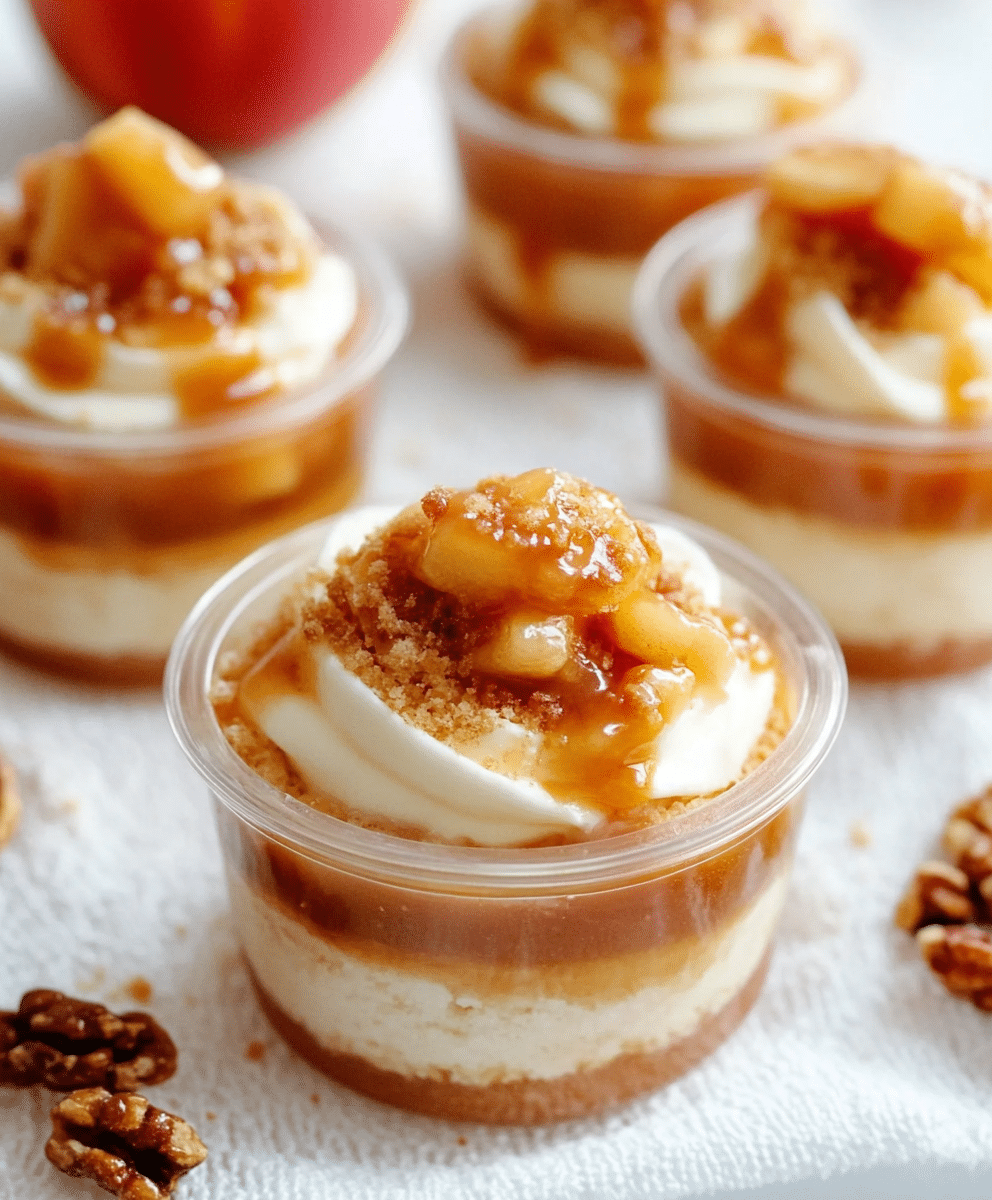
Caramel apple dessert cups are the ultimate fall indulgence, combining the flavors of tart apples, rich caramel, and buttery crumbs, all served in individual-sized portions. These bite-sized desserts are perfect for serving at parties, gatherings, or just as a fun family treat. Easy to assemble and bursting with the classic caramel apple flavor, these cups are sure to become a favorite in your autumn recipe collection. Follow this comprehensive guide to learn how to create the perfect caramel apple dessert cups, complete with tips, variations, and answers to common questions.

What are Caramel Apple Dessert Cups?
Caramel apple dessert cups are a deconstructed version of the classic caramel apple. Instead of being served on a stick, the components are layered or mixed in a cup or jar for easy serving. Each cup is filled with a combination of cooked apples, warm spices like cinnamon, crunchy toppings, and smooth caramel sauce. The result is a perfectly portioned, deliciously sweet treat that delivers all the flavor of a caramel apple without the mess.
Ingredients List for Caramel Apple Dessert Cups
Before you start assembling your dessert cups, gather the following ingredients to make the apple filling, the caramel sauce, and the crunchy base:
For the Apple Filling:
- 4 medium apples (Granny Smith or Honeycrisp work best), peeled and diced
- 2 tablespoons unsalted butter
- 2 tablespoons granulated sugar
- 1 tablespoon brown sugar
- 1 teaspoon ground cinnamon
- ¼ teaspoon ground nutmeg
- 1 teaspoon lemon juice (to prevent browning)
- 1 teaspoon vanilla extract
- Pinch of salt
For the Caramel Sauce:
- 1 cup granulated sugar
- 6 tablespoons unsalted butter (cut into pieces)
- ½ cup heavy cream
- ¼ teaspoon salt (optional, for salted caramel)
For the Crunchy Base:
- 1 cup graham cracker crumbs (or digestive biscuit crumbs)
- ¼ cup unsalted butter (melted)
- 2 tablespoons sugar (optional, for added sweetness)
For Topping (Optional):
- Whipped cream or vanilla ice cream
- Chopped pecans or walnuts
- Extra caramel drizzle
- Crushed graham crackers or shortbread cookies
Substitutions and Variations
Caramel apple dessert cups are highly customizable, allowing you to adjust the ingredients based on personal preferences or dietary restrictions. Here are some popular substitutions and variations:
- Apples: Use your favorite apples or a combination of sweet and tart varieties. Gala, Fuji, or Pink Lady apples can be great alternatives to Granny Smith or Honeycrisp.
- Sugar Alternatives: You can substitute the granulated sugar with coconut sugar, maple syrup, or honey for a slightly healthier twist. Just adjust the sweetness levels to your liking.
- Gluten-Free Option: Use gluten-free graham crackers or almond flour for the base to make this recipe gluten-free.
- Nut-Free Version: Omit any nuts if serving to those with nut allergies, or replace with pumpkin seeds or crushed pretzels for a similar crunch.
- Caramel Alternatives: If you prefer not to make homemade caramel, you can use store-bought caramel sauce or even dulce de leche as a quick alternative.
- Crust Variations: Swap graham crackers for crushed shortbread cookies, ginger snaps, or vanilla wafers to give the base a different flavor profile.
Step-by-Step Cooking Instructions
Step 1: Prepare the Crunchy Base
In a medium bowl, combine the graham cracker crumbs, melted butter, and sugar (if using). Mix well until the crumbs are evenly coated and have a wet sand consistency. Divide the mixture evenly into the bottom of each dessert cup, pressing it down gently to form a crust layer. Place the cups in the refrigerator to chill while you prepare the apple filling and caramel sauce.
Step 2: Make the Apple Filling
In a large skillet, melt the butter over medium heat. Add the diced apples, granulated sugar, brown sugar, cinnamon, nutmeg, and a pinch of salt. Stir to coat the apples evenly with the sugar and spices. Cook the apples for about 8-10 minutes, stirring occasionally, until they soften and start to caramelize. Add the vanilla extract and lemon juice, then stir again. Remove the skillet from heat and let the apple mixture cool slightly.
Step 3: Prepare the Caramel Sauce
In a medium saucepan, heat the granulated sugar over medium heat, stirring constantly. The sugar will first clump up, then melt into a thick amber-colored liquid. Once fully melted, carefully add the butter pieces, whisking constantly until fully incorporated. Slowly pour in the heavy cream while continuing to whisk (be cautious, as the mixture may bubble vigorously). Add the salt if making salted caramel. Continue cooking for another 1-2 minutes until the caramel thickens slightly. Remove from heat and let it cool.
Step 4: Assemble the Dessert Cups
Remove the chilled dessert cups with the graham cracker base from the refrigerator. Spoon a generous amount of the apple filling over the crust in each cup. Drizzle a layer of caramel sauce on top of the apples. If desired, add a dollop of whipped cream or a scoop of vanilla ice cream for extra indulgence.
Step 5: Add Toppings
For a crunchy and decorative finish, sprinkle chopped pecans, walnuts, or crushed cookies on top of each dessert cup. Drizzle more caramel sauce over the top for an extra touch of sweetness. If serving warm, garnish with a bit of whipped cream or ice cream to balance the warm apple filling.
How to Cook Caramel Apple Dessert Cups: A Step-by-Step Guide
- Chill the Base: Make sure to chill the graham cracker crust layer in the refrigerator for at least 15 minutes to help it firm up before adding the apple filling.
- Cook the Apples: When cooking the apple filling, don’t overcook the apples. You want them tender but not mushy, as a slight bite provides a good texture contrast with the caramel and crumbly base.
- Make Caramel Sauce Ahead: You can make the caramel sauce ahead of time and store it in the fridge for up to a week. Just warm it slightly before drizzling over your dessert cups.
- Assemble Just Before Serving: For best results, assemble the dessert cups just before serving to keep the crunchy base from becoming soggy. If prepping in advance, keep the components separate and assemble them when ready to serve.
Common Mistakes to Avoid
- Overcooking the Apples: Be careful not to overcook the apples, as they will become too soft and mushy. You want them to have a slight bite for the perfect texture balance.
- Burning the Caramel: Making caramel can be tricky—keep an eye on the sugar as it melts, and stir constantly to avoid burning. If the caramel burns, it will have a bitter taste and will need to be discarded.
- Soggy Crust: If the graham cracker base is not chilled or compacted properly, it can become soggy from the apple juices. Make sure to press down the crumbs firmly and chill them for at least 15 minutes before adding the apples.
Serving and Presentation Tips
How to Serve Caramel Apple Dessert Cups
Caramel apple dessert cups can be served warm or cold, depending on your preference. For a warm dessert, serve the apple filling hot and drizzle with room-temperature caramel. For a chilled option, you can assemble the cups ahead of time and refrigerate them until ready to serve. They’re great on their own, but pairing them with a scoop of vanilla ice cream or a dollop of whipped cream adds extra indulgence.
Presentation Ideas for Caramel Apple Dessert Cups
- Layered Look: Create neat, visible layers of the crunchy base, apple filling, and caramel by using clear glass cups or jars. This makes the dessert not only delicious but visually appealing as well.
- Individual Jars: Serve the dessert in small mason jars or individual trifle dishes for a charming, rustic presentation, perfect for parties or gatherings.
- Topping Bar: If serving a crowd, set up a topping bar with various garnishes like nuts, sprinkles, and extra caramel, allowing guests to customize their own cups.
Caramel Apple Dessert Cups Recipe Tips
- Chop Apples Evenly: Try to dice your apples into evenly sized pieces to ensure they cook uniformly.
- Caramel Thickening: If your caramel sauce becomes too thick after cooling, gently reheat it with a splash of heavy cream to return it to a pourable consistency.
- Make-Ahead Option: You can prepare all the components ahead of time—just keep the apple filling, caramel sauce, and graham cracker crust separate until you're ready to assemble.
Frequently Asked Questions (FAQs)
Can I make these dessert cups ahead of time?
Yes! You can prepare the individual components ahead of time and assemble the cups just before serving. Store the cooked apples and caramel sauce in the refrigerator and the graham cracker base in an airtight container.
What type of apples should I use?
Tart apples like Granny Smith or Honeycrisp are ideal for this recipe because their tartness balances the sweetness of the caramel and sugar.
Can I use store-bought caramel sauce?
Absolutely! If you're short on time or prefer the convenience, feel free to use store-bought caramel sauce. Just make sure it's a high-quality, thick caramel sauce for the best flavor.
How long do these dessert cups last?
Once assembled, they are best eaten the same day to maintain the crunchy texture of the crust. However, the apple filling
and caramel sauce can be stored separately in the refrigerator for up to 3 days.
Can I freeze caramel apple dessert cups?
It's not recommended to freeze the assembled dessert cups, as the apple filling may become watery and the crust can lose its texture. However, you can freeze the cooked apple filling and caramel sauce separately for later use.
Conclusion
Caramel apple dessert cups are a delightful fall treat that brings together the cozy flavors of apples, caramel, and cinnamon into a fun, easy-to-serve dessert. Whether you’re preparing them for a holiday gathering, a fall party, or just a special family treat, these dessert cups are sure to impress with their rich flavor and elegant presentation. With simple ingredients and customizable options, you can enjoy the taste of caramel apples without the hassle, all in a deliciously layered cup!
PrintCaramel Apple Dessert Cups Recipe
This classic pumpkin roll recipe is a fall favorite, featuring a light and spongy pumpkin cake rolled around a creamy, sweet cream cheese filling. With the perfect balance of pumpkin spice and smooth frosting, it's a great dessert for holiday gatherings or an indulgent treat.
- Prep Time: 20 minutes
- Cook Time: 15 minutes
- Total Time: 35 minutes
- Yield: 10 servings 1x
- Category: Dessert
- Method: Baking
- Cuisine: American
- Diet: Vegetarian
Ingredients
- ¾ cup all-purpose flour
- 1 cup granulated sugar
- 1 tsp baking powder
- 2 tsp ground cinnamon
- ½ tsp ground ginger
- ½ tsp ground nutmeg
- ¼ tsp salt
- 3 large eggs
- ⅔ cup pumpkin puree
- 1 tsp vanilla extract
- 8 oz cream cheese, softened
- 1 cup powdered sugar
- 6 tbsp butter, softened
- 1 tsp vanilla extract
- Powdered sugar (for dusting)
Instructions
- Preheat oven to 375°F. Line a 15x10 inch jelly roll pan with parchment paper and grease it.
- In a bowl, whisk together flour, baking powder, cinnamon, ginger, nutmeg, and salt.
- In another bowl, beat eggs and sugar until thick. Stir in pumpkin and vanilla extract.
- Gently fold in the dry ingredients until combined.
- Spread the batter evenly into the prepared pan and bake for 13-15 minutes.
- While warm, carefully roll the cake up in a towel dusted with powdered sugar and let it cool completely.
- For the filling, beat cream cheese, butter, powdered sugar, and vanilla extract until smooth.
- Unroll the cake, spread the filling evenly, then re-roll. Dust with powdered sugar before serving.
Notes
- For easier rolling, ensure the cake is rolled while warm.
- Keep the pumpkin roll refrigerated to maintain its shape and freshness.
Nutrition
- Serving Size: 1 slice
- Calories: 320
- Sugar: 27g
- Sodium: 180mg


Leave a Reply